Last Updated on April 24, 2026 by Sara Belle
Every Easter I tell myself I’ll keep my nails simple. Nude, maybe a soft pink — nothing that takes more than ten minutes. And then I open Pinterest. Fifteen minutes later I’m ordering a new speckle sponge and debating whether I have steady enough hands for bunny ears. If that sounds familiar, you’re in the right place.
These easter nail design ideas range from genuinely easy (pastel base, done) to the kind that require a bit of patience and a thin brush. I’ve tried most of them, and I’ll be upfront about which ones are trickier than they look. Whether you’re painting your own nails at home or bringing inspo to your nail tech, there’s something here for every skill level and nail length.
Here’s what we’re covering: ten designs from soft and wearable to detailed and creative, plus a few practical tips and the questions I see asked most often about Easter manicures.
1. Pastel Paradise
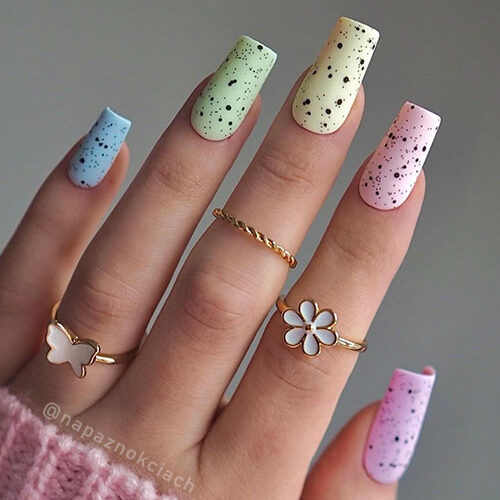
This is the design I keep coming back to. There’s something about the speckled finish on a pastel base that feels genuinely spring-like — it looks like a row of tiny Easter eggs sitting on your hand. The technique is simpler than it appears: dab a dry cosmetic sponge loaded with a darker shade over a pastel base, and you get that organic speckle pattern almost instantly.
What I love most is the mix of colors across the nails — each one a slightly different pastel, which means you don’t have to commit to a single shade. Baby blue on one, blush pink on another, mint on the ring finger. It works without looking chaotic.
If you’re new to nail art and want something low-pressure, start here. It’s one of those looks that photographs better than it is difficult to execute. For more spring-ready nail color combinations, the March nails roundup has a lot of similar pastel energy worth browsing.
2. Bunny Beauties
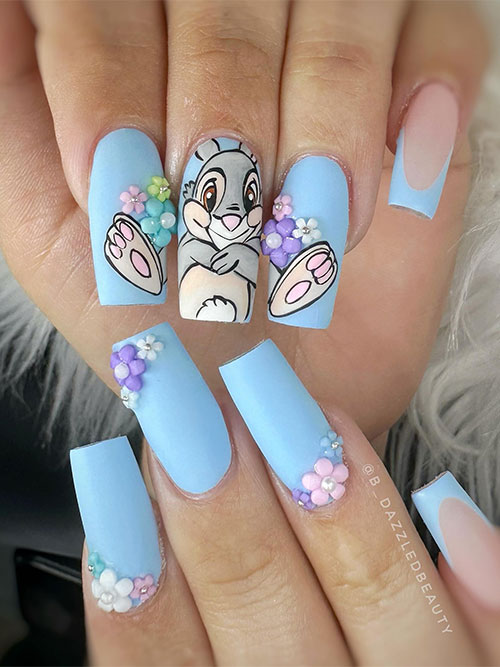
I’ll be honest with you — bunny faces are harder than they look. The ears are fine, the face shape is fine, but getting both eyes the same size with a nail art brush? That’s where I’ve lost about 40 minutes of my life across multiple attempts.
That said, this matte baby blue version keeps it impressively clean. The bunny sits on one accent nail, and the rest stay a smooth matte blue with a single flower detail. It’s a clever workaround: you only have to execute the bunny face once, which is much more forgiving than painting five of them. If you’re going DIY, practice the face on paper first. Seriously.
3. Eggstravagant Eggs
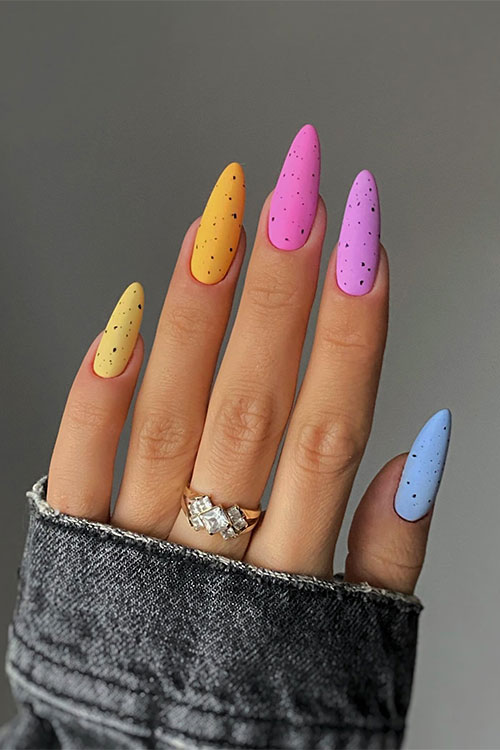
Each nail its own egg — that’s the concept here. Matte finish, each finger a different Easter color, with black speckles scattered across for texture. The almond shape adds a softness that stops the whole thing from feeling too loud.
This is one of the most versatile easter nail design ideas in the list because the color palette is completely flexible. Softer pastels give you something wearable to the office. Brighter versions — neon yellow, coral, hot pink — push it into bold territory if that’s more your style. The black speckle detail is the unifying element either way.
4. Charming Chicks
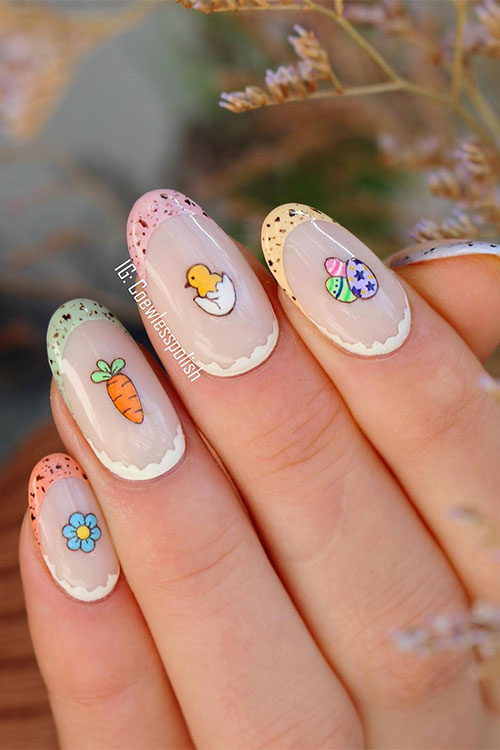
This one is busy in the best possible way. Look closely and you’ll find a chick, a carrot, a flower, and an egg — all on short nails with speckled French tips. It reads as a little Easter scene rather than just nail art.
Realistically, this is a nail tech design. The individual motifs are tiny and require a very fine brush and a steady hand. But if you’re bringing this as inspo to your appointment, it photographs beautifully and gives the nail tech real creative room to work. The speckled French tip is a nice touch that keeps the design cohesive across all ten nails even when the art varies nail to nail.
5. Floral Delight
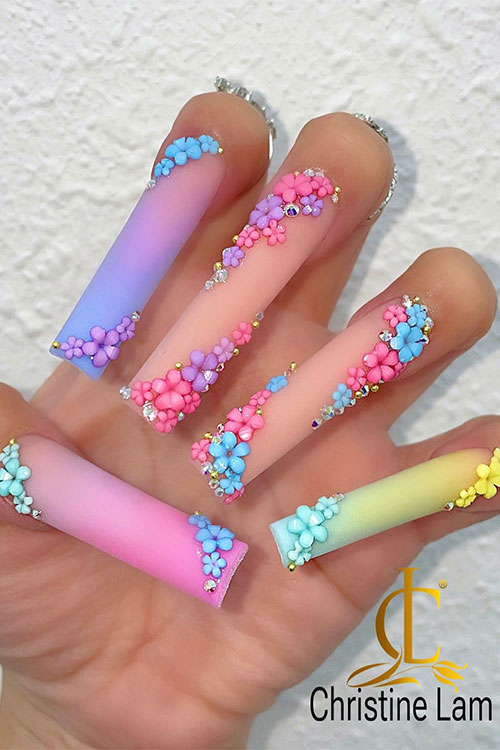
This one surprised me. I expected a basic floral design — and then I saw the ombre. Each nail blends from one pastel to another, and then sits within that broader gradient across the full hand. It takes more planning than most designs here, but the result looks like a watercolor painting.
The floral details are minimal, which is actually what makes this work. Too much going on would compete with the ombre. Instead, a few soft petals here and there let the color do the heavy lifting. If the full ombre feels too ambitious, doing the gradient on just two accent nails and keeping the rest solid pastel gives a similar effect with half the effort. Pink ombre nail designs has some great technique breakdowns if you want to practice the blending first.
6. Easter Basket Bliss
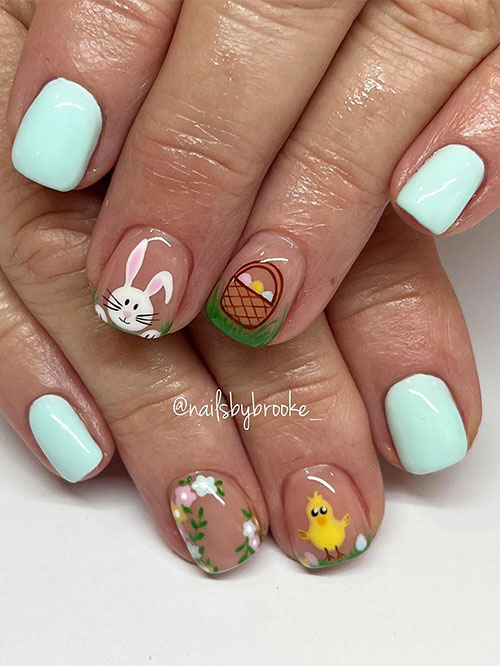
There’s something unexpectedly charming about having an Easter basket painted on your nail. The woven texture detail is what sells it — it’s the kind of thing you notice when someone looks closely and does a double take. Combined with the chick, flower, and bunny on the other nails, it tells a full little Easter story.
Short nails actually work well here. The designs are compact enough that nothing gets crowded. This is another one I’d take to a professional, mostly for the basket weave detail — that requires real precision.
7. Playful Polka Dots
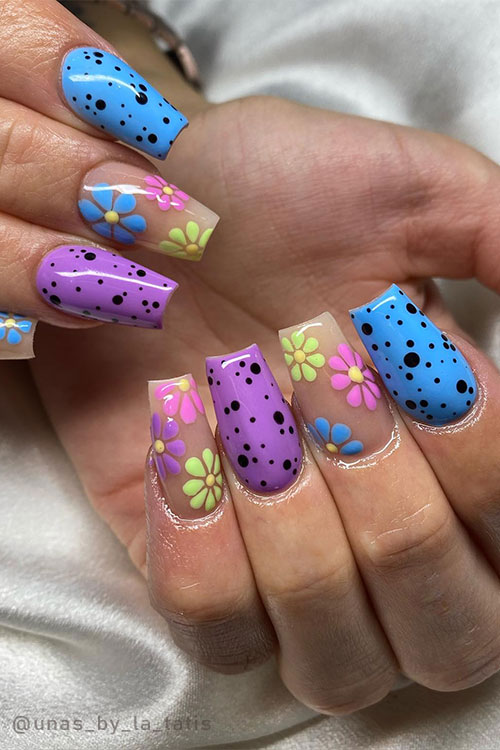
Polka dots are one of those designs that feel much easier to pull off than anything hand-drawn, which is why I like recommending them to people who are newer to nail art. A dotting tool or even the blunt end of a bobby pin gives you clean, consistent circles.
The Easter version just needs a pastel base and dots in a contrasting or complementary shade — think yellow dots on baby blue, or white dots on lavender. The floral accent nail in this version breaks up the pattern nicely without requiring much extra skill.
8. Springtime Stripes
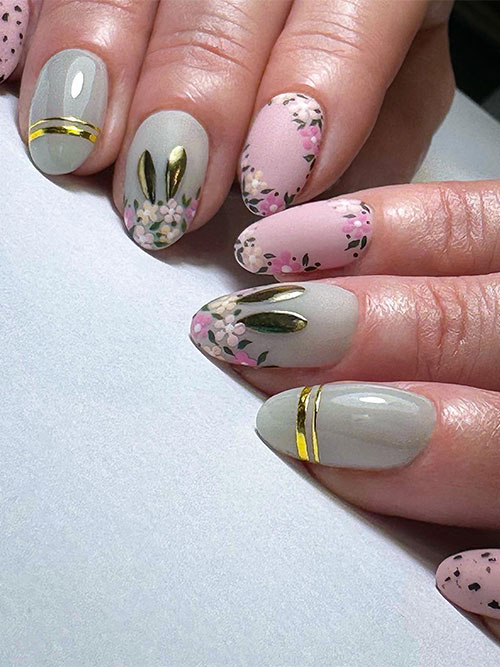
Gold stripes on a pastel base shouldn’t work as well as they do, but here we are. The metallic against soft pink or lavender feels elevated in a way that polka dots don’t quite reach. This is the design I’d choose if I wanted the Easter theme to be subtle — something a colleague might not immediately identify as holiday-specific, but that still feels festive up close.
Nail striping tape makes this achievable at home. Press the tape down over a dry base coat, paint over it, and peel while still slightly wet. Pair with one accent nail featuring a small bunny or flower and you’ve covered the full Easter brief without it feeling costume-y.
9. Glitter Glam
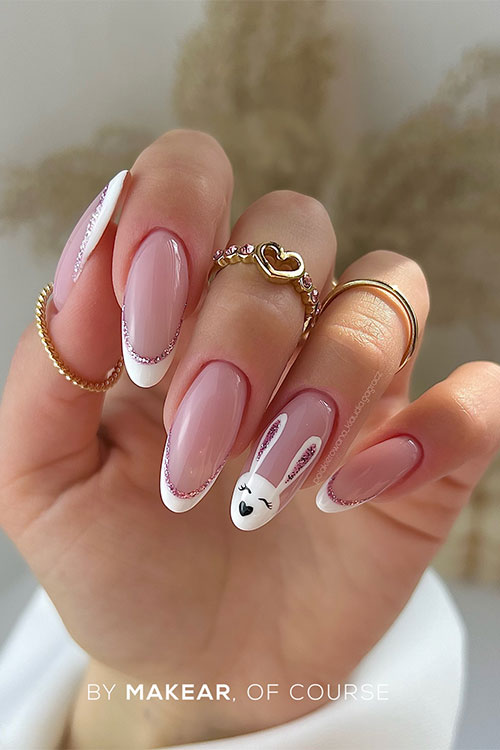
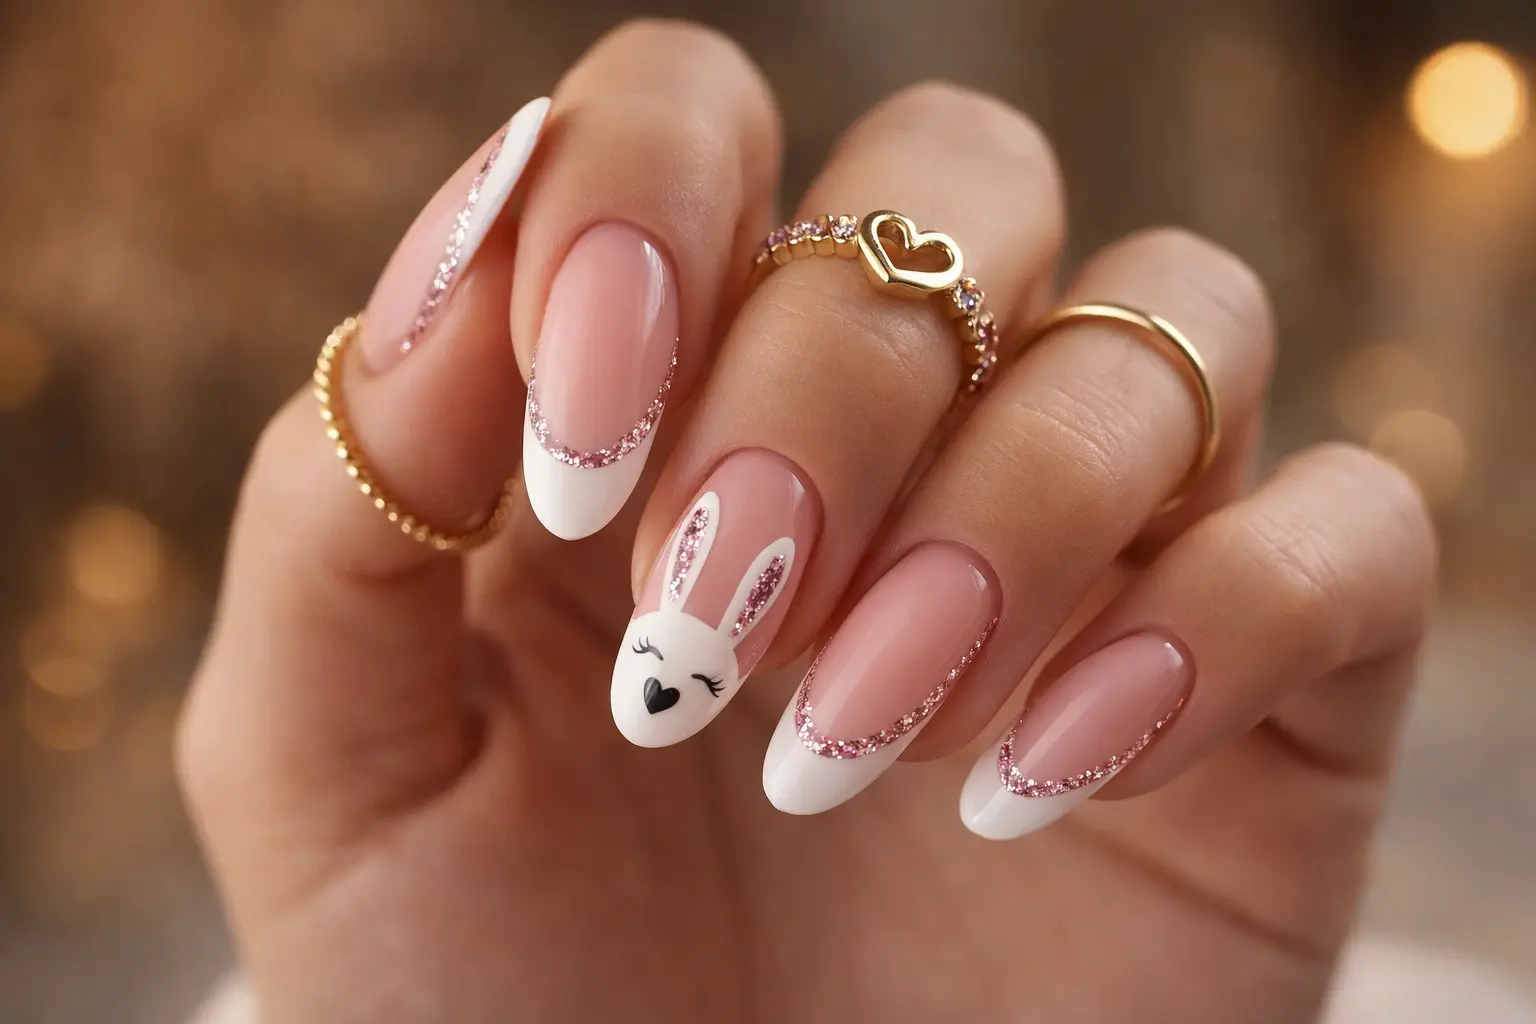
A white French tip with rose gold glitter is one of those combinations that photographs almost too well. The glitter catches light differently at every angle, which means your nails look a little different in every photo — somehow always good.
The bunny detail on a single accent nail keeps this from tipping over into “just glitter nails.” It’s a small Easter reference that ties the whole look to the holiday without dominating. This is probably the most wearable design in the list if you’re attending an Easter gathering that also involves family photos — elegant enough for adults, festive enough to feel seasonal.
10. Pink Easter Floral Design
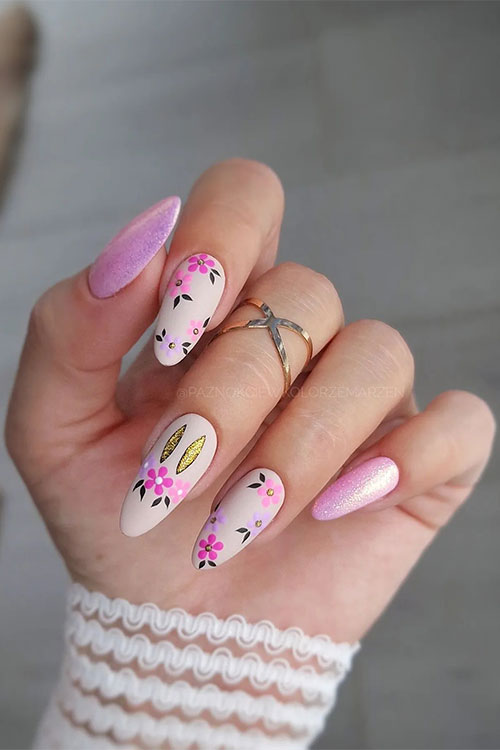
Light pink, purple, a gold bunny, and shimmer gel — this design does a lot of things and somehow keeps them cohesive. The matte nude base acts as the neutral that lets everything else coexist without fighting. I’ve recommended this one to people who don’t love overtly “themed” nail art but still want something that fits the occasion.
The gold bunny ear detail is delicate enough that it reads as elegant rather than novelty. It’s the kind of design where someone might say “those are pretty” before they even notice the Easter element, which for some people is exactly the balance they’re looking for.
Practical Tips Before You Start
A few things I’ve learned from doing these designs repeatedly — some the hard way:
- Prep matters more than the design. Push back your cuticles, buff lightly, and use a base coat. A great design on unprepared nails will chip in two days. A simple design on well-prepped nails can last a week. This is especially important if you want your Easter manicure to survive the holiday itself — start with a solid DIY manicure routine to set yourself up properly.
- Thin coats always. Two thin coats of color beat one thick coat every time. Thick coats bubble, streak, and take ages to dry.
- For speckle designs, use a dry sponge. Load a small piece of dry cosmetic sponge with polish, dab most of it off on a paper towel, then lightly tap it over your nail. The result looks more organic than anything you can do with a brush.
- Let each layer fully dry. This sounds obvious, but rushing it is the number one reason designs smear. If you’re impatient (same), point a small fan at your nails between coats.
- Seal everything with a good top coat. Especially on designs with painted details — a quality top coat extends wear significantly and protects the art underneath. For more durability tips, check out this guide on long-lasting manicures.
- Know your skill level before you start. Some of these are genuinely beginner-friendly (speckled, polka dots, stripes). Others involve very fine detail work that’s better left to a professional. There’s no shame in taking inspo photos to the salon — that’s the smart move for complex designs.
If you’re starting from scratch with nail art and want to build your technique, easy nail art designs for beginners covers a lot of useful foundational skills that will make the harder designs here much more approachable.
FAQ
What are the most popular Easter nail design ideas right now?
Speckled pastel nails are having a huge moment — they mimic the look of Easter eggs and are surprisingly easy to DIY with a dry sponge. Bunny accent nails and soft floral ombre are also consistently popular every spring.
Can I do Easter nail designs at home without a nail art brush?
Yes, several designs in this list work without specialist tools. Speckled nails just need a dry sponge or old toothbrush. Polka dots can be made with the blunt end of a bobby pin. Pastel ombre works with a makeup sponge. For designs with fine details like bunnies or chick faces, a thin brush does help — but you can find basic nail art brushes for a few dollars that make a real difference.
How long do Easter nail designs typically last?
With a gel base and top coat, most designs last 1–2 weeks. Regular polish with a good top coat usually gives you 5–7 days before you start seeing chips, depending on how active your hands are.
Are Easter nail designs only for long nails?
Not at all. Most looks here — including the Easter basket, polka dots, and pastel paradise — work well on short or medium nails. The speckled designs actually look sharper on shorter shapes because there’s no risk of the pattern getting too spread out.
What nail polish colors should I stock up on for easter nail design ideas?
Baby blue, blush pink, mint green, and pale yellow cover almost every look in this article. Add a white and a thin black liner polish if you want to attempt any detail work. Rose gold glitter is worth having too — it shows up in more designs than you’d expect.
Ready, Set, Spring
Of everything in this list, the one I’d push you toward first is the Pastel Paradise speckle design — specifically if you’re planning to DIY. It has that “I tried” energy without actually requiring much technique, and the payoff in photos is genuinely good. If you’re going to the salon, take the Pink Easter Floral or the Glitter Glam designs as your inspo; both are sophisticated enough that you’ll still want to wear them past Easter weekend.
Which one are you leaning toward? Drop it in the comments — and if you’ve already tried any of these, I’d love to know how they held up.

Shop my favorite picks on Amazon
VISIT MY STOREFRONT 🛒