
Last Updated on April 24, 2026 by Sara Belle

My first attempt at nail art ended with leopard spots that looked more like abstract blobs and a living room that smelled like acetone for two days. I wiped it all off, told myself it wasn’t for me, and went back to plain polish for another year. What changed? I stopped watching 60-second tutorials that skipped every single useful detail and actually sat down with step-by-step instructions that showed me nail art designs broken into manageable moves.
That’s the whole point of what you’ll find here. Five designs, each one genuinely doable at home without a nail salon setup, without spending money on a kit, and without any artistic talent you don’t already have. Some only need a toothpick. If you’ve been wanting to try something beyond a single color, this is where to start.
Manicure Idea 1 – Cheetah or Leopard Easy Nail Art Design
This one surprised me the most. It looks like you need a steady hand and some special tool, but the whole thing is done with a toothpick — and the slightly imperfect, organic quality of each spot is actually what makes it look real. Leopard print is forgiving in a way that geometric designs aren’t.

You’ll need: yellow nail polish (NYC Gel Gloss works well), black polish, and a toothpick or thin nail art brush.
- Paint your nail yellow and let it dry completely.
- Dip a toothpick into the black polish and draw irregular C-shapes scattered across the nail.
- Mix in a few larger spots and some smaller ones — the variation is the whole look.
- Fill empty gaps with single black dots until the nail feels balanced.
The trick is resisting the urge to make all the spots the same size. Real leopard print isn’t uniform, and neither should yours be. Once you try this, you’ll want to do it on every nail.
Manicure Idea 2 – Three steps Nail Design
This one is purely about color theory, which sounds more complicated than it is. You pick three colors, apply them in a repeating diagonal pattern, and end up with something that looks like you planned it carefully. A nail striper or even a thin brush from a craft store is all you need for the lines.
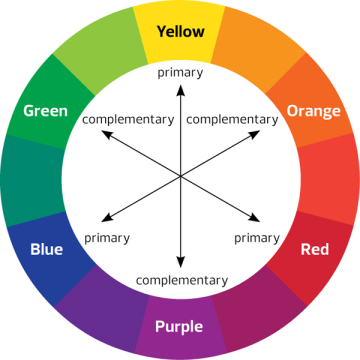
Using a color wheel to choose your three shades helps more than you’d think. Colors that sit opposite each other on the wheel (complementary colors) create high contrast and make each stripe pop. Colors that sit next to each other (analogous) give a softer, blended look. Both work — it just depends on the mood you want.

- Paint the base coat in your first color and let it dry.
- Pick the second color and follow steps 2–4 in the tutorial image above to create the diagonal pattern.
- Repeat with the third color following steps 5–7.
Green, purple, and yellow is a bold combo — but don’t be afraid to go softer. Nude, dusty pink, and white creates a really wearable everyday version of this same design.
Manicure Idea 3 – The Wonder Woman Nail Art Design
Don’t let the ten steps scare you. Most of them are just “wait for it to dry” or “clean up the edges,” which doesn’t really count as a step in my book. The actual painting is two diagonal stripes on each side of a glittery green base — that’s it.

- Apply base coat and let it dry.
- Apply the first layer of glittery dark green polish and let it dry.
- Apply the second layer and let that dry too — don’t rush this part.
- Draw two diagonal white stripes starting from the center, going toward each side of the nail tip.
- Clean up any wobbles with a cotton tip dipped in acetone.
- Draw two bright red stripes parallel to the white ones.
- Final cleanup, then seal with top coat.
The acetone cleanup step is a game-changer for nail art generally, not just this design. Messy edges don’t mean a failed attempt — they mean you haven’t cleaned up yet.
If you want to take your nail prep seriously before attempting detailed work like this, a proper DIY manicure routine at home makes a noticeable difference — smooth, prepped nails mean cleaner lines and less frustration.
Manicure Idea 4 – Twisted Easy Nail Art Design
Out of all five designs here, this is the one that looks the most complex once it’s done. The pattern builds up through repetition — you’re just layering the same three diagonal stripes over and over until they fill the nail. It’s almost meditative once you get into it.

- Start with a base coat to protect your natural nail.
- Apply green polish at the very top of the nail (near the tip) and let it dry.
- Make a diagonal pink stripe from one side of the nail and let it dry.
- Make a diagonal stripe in a contrasting color from the other side so it crosses the pink stripe.
- Repeat the three previous steps until the pattern fills the nail.
- Clean up the edges with a brush dipped in remover.
- Apply top coat to seal and finish.
The key here is going slowly and letting each stripe dry before adding the next. Rushing creates muddy color where the stripes overlap, which ruins the whole interlocked effect.
Manicure Idea 5 – White and Black Polka Dot Easy Nail Art Design
My personal favorite on this list, and the one I keep coming back to. There’s something about polka dots that looks intentional and put-together without requiring much skill — and because each dot is independent, one slightly wobbly circle doesn’t ruin the whole nail.
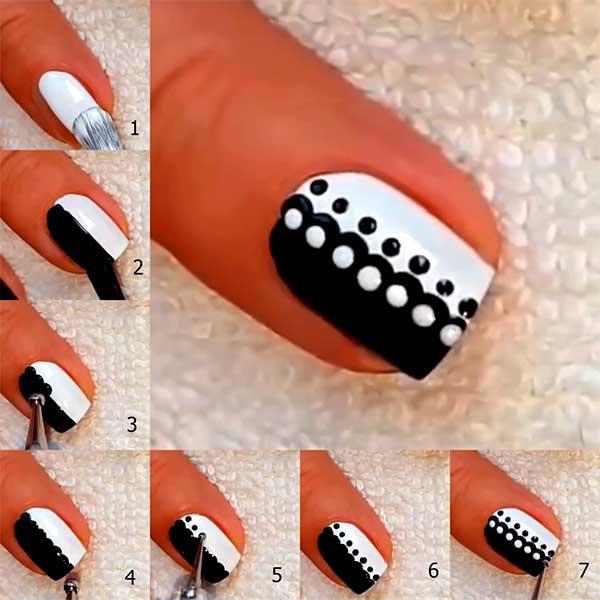
What you need: white polish, black polish, base coat, top coat, and a dotting tool (or a bobby pin straightened out at one end — works just as well).
Follow the seven steps in the tutorial image above. The spacing doesn’t have to be mathematically perfect — polka dots that are slightly scattered actually look more relaxed and modern than a rigid grid.
Once you’ve got the basics down, this same technique opens up a world of pattern options. The vibrant neon nail ideas on this site use a lot of the same dot and accent techniques, just with bolder color choices.
Practical Tips Before You Start
A few things I wish someone had told me before my first attempt:
- Always use a base coat. It protects your natural nail from staining (especially with dark colors) and gives polish something to grip. Skip it and your manicure chips faster.
- Thin layers beat thick ones, every time. A thick coat looks faster but takes forever to dry fully and ends up denting or peeling. Two thin coats will always look better.
- Give yourself a color direction before you start. If you’re not sure what shades work together, a quick look at current manicure design inspiration can help you find combinations that are already proven to work well.
- A top coat is non-negotiable for nail art. It seals the design, prevents chips, and adds a glassy finish that makes everything look more polished (literally). Learn how to make it last longer with these tips on achieving long-lasting manicures.
- Acetone is your best friend. Keep a small bowl of nail polish remover and a few cotton swabs on hand while you work. Cleaning up edges after the design dries is half the technique.
- Don’t write off a design after one try. Every single technique here takes two or three attempts before it starts looking like the tutorial photo. The second time is always significantly better than the first.
Frequently Asked Questions
What nail art designs are easiest for absolute beginners?
Polka dots and simple stripes are the most forgiving nail art designs for beginners — all you need is a toothpick or a dotting tool, and small mistakes are barely noticeable. The leopard print tutorial in this article is also surprisingly easy once you get the hang of drawing C-shapes.
Do I need special tools to do nail art at home?
Not at all. A toothpick works great for dots and basic line work. A thin nail art brush or a nail striper handles straight lines and diagonal patterns. Bobby pins can even substitute for dotting tools in a pinch.
How do I stop nail art from smudging?
The biggest culprit is rushing between layers. Let each coat dry fully before adding the next — at least 2 minutes for regular polish. A fast-dry top coat applied at the very end seals everything and adds a noticeable glossy finish.
Can I mix nail art designs on different fingers?
Yes, and it actually looks really intentional! Pick one design as your main nail art pattern across most fingers, then use a second simpler design or a solid color as an accent nail on the ring finger. It adds variety without looking messy.
How long do at-home nail art designs last?
With a good base coat and a top coat, most regular polish nail art lasts 4–6 days before chipping starts. Gel-based polishes can stretch this to 1–2 weeks. Sealing the free edge of your nail with the top coat is one of the easiest tricks to extend wear.
Final Thoughts
If I had to pick just one design to start with, I’d go straight to the polka dots. It’s genuinely hard to mess up, the result looks put-together even when it’s not perfectly symmetrical, and it builds the muscle memory you need for everything else. Once dots feel comfortable, the leopard print and twisted diagonal designs suddenly seem a lot less scary.
Which of these are you planning to try first? Drop a comment below — and if you’ve been nervous about nail art designs at home, I promise it gets easier much faster than you’d expect. Give it one real attempt and see what happens.
Shop my favorite picks on Amazon
VISIT MY STOREFRONT 🛒